Linux Primer
The purpose of this lesson is to help you become more proficient with Linux.
ERP Admin and Analyst Must Know
- Add aliases to ~/.bashrc... Examples:
- alias shortName="your custom command here"
- alias ll="ls -l" # list long
- alias ltr="ls -ltr" # list long time sort descending
- You will use this technique to create ssh shortcuts for all your customers. Example: ssh_custname_prod_id ==> ssh -i ~/path-to-pem user@IP-Address
- regular expressions
- Great tutorial - you will use this a lot!!
- Great trainer
- vim - start with vimtutor (tutorial from command line)
- Most common commands:
- grep - to find stuff within files.... Examples:
- grep -rni . -e sometext # search the current directory recursively without case sensitivity, show the line number and search using regular expression
- find - to find files or directories... Examples:
- find -name somefile
- Note: I use fd instead of the find command
- sed - text substitution outside of an editor
- ssh and scp with -i pem key (example connect to aws ec2 or copy file from local to aws ec2)
- df - see disk usage
- grep - to find stuff within files.... Examples:
- pass - password manager using standard linux tools and concepts - great tutorial
Common Commands and Troubleshooting
Here is an article that will teach you the commands that you use most with administering iDempiere on Linux. The article also covers how to troubleshoot and problem iDempiere installation problems.
Connecting to Linux (using AWS)
Using Putty to Connect to and control an AWS Ubuntu Linux from Windows
- Create an AWS key pair (tutorial). This will act as your password when using putty.
- Install putty - use the windows putty installer to install all putty tools. I recommend using the windows installer for all tools.
- Convert your AWS keypair (pem) it into something Putty can use (ppk) and connect to your server using this tutorial.
- Use the tutorials here to configure your iDempiere Open Source ERP server.
Here is a tutorial for how to connect to Linux from a Mac.
Connecting to a Server without a Password
There are times when you connect to a server via ssh where you are asked with a username and password. Here is how you use key to replace your username/password.
ssh-keygen #if you do not already have a key
ssh-copy-id -i ~/.ssh/your_pub_key.pub username@host
Here is a the recommended way to create a key (more secure than the above default)
ssh-keygen -t ed25519 -a 100
Where:
- -t specifies the Ed25519 standard
- -a specifies the number of KDF rounds used. Higher numbers result in slower passphrase verification and increased resistance to brute-force password cracking (should the keys be stolen). The default is 16 rounds.
Set hostname
sudo hostnamectl set-hostname sandXXX
Connecting to Linux (using VirtualBox)
- Install VirtualBox on your local machine. Note: your local machine needs to be 64bit.
- Download the Ubuntu 14.04 LTS image (ISO). As an alternative to installing Ubuntu yourself, you can download an already installed VirtualBox Ubuntu VM from here. Make sure you choose the 14.04 64bit version.
- Launch VirtualBox and install Ubuntu - see tutorial. Be sure to take note of the of your username. I recommend you use 'ubuntu' for simplicity. Also, be sure to install openssh-server when the server asks. You will use this tool to connect putty later.
- After installing Ubuntu, I recommend you create a snapshot of your system. This will enable you to revert later just in case things go badly. It will save you much time!!
- You will want to connect to your Ubuntu server (guest OS) from your local machine (host OS). VirtualBox provides two ways to doing this
- Set the Networking mode to "Bridged Adapter". This puts your guest os directly on your local network. Be aware that VirtualBox bridged adapter mode does not always work when you are connected via a wireless network adapter. Typing ifconfig from your server's terminal will tell you the server's IP address.
- Leave VirtualBox Networking Mode on NAT and set up VirtualBox port forwarding for port 22.
- Make sure you extend your sudo timeout so that it does not timeout during installation. See the below section regarding this topic. FYI - when installing across slow internet connections, it can take hours.
- The ubuntu terminal provided by VirtualBox is not good because you cannot copy/paste. Instead, install putty (windows putty installer) and connect to your server using the details from the previous bullet. Once putty is connected, you can simply right-click in putty to paste the iDempiere Installation Script.
Linux Containers LXC LXD
rsync with PEM Key
Here is an example:
rsync -av --delete -e "ssh -i ~/.ssh/somekey.pem" idempiere-mm-deploy ubuntu@lxd99.chuboe.org:~/delme/
Backup Data with rsync.net
rsync.net is a great resource to use native Linux commands to move data to an off-server resource. The purpose of this section is to create a convenient reference.
- Change password
- ssh -t de19@de19.rsync.net passwd
- List contents of root directory
- ssh de19@de19.rsync.net ls
- Show tree of contents (all files)
- ssh de19@de19.rsync.net tree
- Simple scp example
- scp /path/to/some/file de19@de19.rsync.net:path/to/some/remote/directory/.
- Simple rsync example
- rsync -avH /path/to/some/directory de19@de19.rsync.net:path/to/some/remote/directory
- Remote linux commands
- Page dedicated to rsync
- Copy local key to prevent needing a password with every command
- Create a local key (note: do not overwrite an existing key)
- ssh-keygen
- First computer (note: this command overwrites the existing key in rsync.net if any present)
- scp ~/.ssh/id_rsa.pub de19@de19.rsync.net:.ssh/authorized_keys
- All additional computers to access without a password
- cat ~/.ssh/id_rsa.pub | ssh de19@de19.rsync.net 'dd of=.ssh/authorized_keys oflag=append conv=notrunc'
- Create a local key (note: do not overwrite an existing key)
View rsync.net Snapshots
ssh de19@de19.rsync.net ls -asl .zfs/snapshot/
Once you find the file(s) you want, you can simply use the 'scp' or 'rsync' commands to download the file(s).
Encrypt File with ssh Key
You can use the `openssl` command-line tool in Linux to encrypt a file using an SSH key. Here's how you can do it:
Encrypt the file using the public key:
openssl rsautl -encrypt -inkey id_rsa.pem -pubin -in input_file -out encrypted_file
- `input_file`: The file you want to encrypt.
- `encrypted_file`: The name of the output encrypted file.
This command uses the `openssl rsautl` utility to encrypt the `input_file` using the public key from `id_rsa.pem` and saves the encrypted data to `encrypted_file`.
To decrypt the file:
openssl rsautl -decrypt -inkey ~/.ssh/id_rsa -in encrypted_file -out decrypted_file
- `encrypted_file`: The encrypted file you want to decrypt.
- `decrypted_file`: The name of the output decrypted file.
This command uses the `openssl rsautl` utility to decrypt the `encrypted_file` using the private key `~/.ssh/id_rsa` and saves the decrypted data to `decrypted_file`.
Resize Hard Drive - AWS
Resize your disk by modifying the volume (example AWS).
lsblk ## see existing
df -h ## see existing
sudo growpart /dev/xvda 1 ## grow the partition
lsblk ## see existing
df -h ## see existing
sudo resize2fs /dev/xvda1 ## grow the file system
df -h ## see existing

#if nvme example
sudo growpart /dev/nvme0n1 1
sudo resize2fs /dev/nvme0n1p1
Reference: http://docs.aws.amazon.com/AWSEC2/latest/UserGuide/recognize-expanded-volume-linux.html
Resize Hard Drive - Virtualbox
The above solution struggled to work in virtualbox after modifying the size of the VDI in Virtualbox => Media. It showed the extra space as unallocated; however, growpart would not use it. Below is what worked where ubuntu--vg-ubuntu--lv was my logical partition in sda3.
 sudo pvs #show details
 sudo pvresize /dev/sda3
 sudo lvextend -rl +100%FREE /dev/mapper/ubuntu--vg-ubuntu--lv
 df -h #confirm details
Mapping Java Threads to Linux OS Processes (PID)
Substitute Word
Key terms: context, substitution, substring
To replace the first occurrence of a pattern with a given string, use ${parameter/pattern/string}:
#!/bin/bash
firstString="I love Suzi and Marry"
secondString="Sara"
echo "${firstString/Suzi/"$secondString"}"
# prints 'I love Sara and Marry'
To replace all occurrences, use ${parameter//pattern/string}:
message='The secret code is 12345'
echo "${message//[0-9]/X}"
# prints 'The secret code is XXXXX'
Other references:
- https://github.com/chuboe/idempiere-installation-script/blob/master/idempiere_install_script_master_linux.sh#L1248 - see "Utility Scripts" section at the bottom of the file for variable substitution in properties file.
Persist PID to File
There are times when you need to persist the PID of a process upon its creation. This was helpful when building the service descriptor for idempiere.service.
Add the following to the end of a command that launches a process:
somecommand & echo $! > java.pid
References:
- https://superuser.com/questions/1700414/how-can-i-correctly-retrieve-the-pid-of-a-process-related-to-java-using-ps-aux
Connect to Linux and Creating an encrypted tunnel
This technique is often used to connect to a resource (phppgadmin or phpmyadmin for example) that is limited to the server's localhost.
Transferring Files
There are times when you need to upload or download files to/from Linux from a Windows or Mac machine. I recommend that you use filezilla. Here is a tutorial illustrating how to configure and use filezilla.
CLI Speed Test
curl -o /dev/null -w '%{speed_download}\n' http://speedtest.tele2.net/10MB.zip 2>/dev/null | awk '{printf "%.2f Mbps (%.2f MB/s)\n", $1*8/1000000, $1/1048576}'
htop and top Utilities
https://www.youtube.com/watch?v=4isEhE2rvmA
htop help:
- htop -d 100
- tells htop to delay 10 seconds between refresh
- Inside htop
- F
- tells htop to follow the currently highlighted process
- Z
- tells htop to temporarily pause refresh
- F
top help:
- top -H -b -n1 -c | vim -
- puts the results of top into vim for searching
- you can also pipe it into the less command (ex: echo "chuck" | less)
Keeping a Terminal Session Alive When Disconnected
There are times when your internet connect will break during a terminal session. When this happens, your terminal processes will end abruptly. This is very bad when you are performing critical tasks like upgrading iDempiere. A broken connection will leave your iDempiere installation in a bad state.
I use the tmux command/tool to keep sessions alive in the event that your connection breaks. tmux is both powerful and complex.
Screen is a much more simple solution for keeping connections alive.
Check Disk and Directory Size and Space
Disk space
du -h
Find the biggest directories
sudo du -h ./*/ | sort -h > ~/directorysize.txt
Killing a Process
There are times when you need kill a linux process. The 'kill' command to ask the process "please stop".
kill <process_id>
Where <process_id> is the pid of the process. You can find the pid using the ps command.
ps aux | grep idempiere
Where ps has the arguments to show the pid, name and description of the process. The grep command is used to limit the results to those including the word 'idempiere'.
If the process does not listen, you can use a stronger version of the kill command that tells linux to end the process forcefully.
kill -9 <process_id>
Where -9 refers to 'sigkill' or signal kill.
More information about sigterm vs sigkill (-9)
Logging System Statistics
Show system processes (without continuous sort).
top -H -b -n1 -c
dstat is a nice debugging tool to help you understand how your system is performing.
dstat -ta --top-cpu --noheader --output systemstats.csv
Run the following command from your home directory to create a background process that keeps a second by second log of your system's performance in a file called systemstats.csv.
nohup dstat -ta --top-cpu --noheader --output systemstats.csv &
This command will tell you the process id that is created. When you are ready to stop the logging, enter the command
kill xx
where xx is the process id that was given to you earlier. You can enter this command to find all processes:
ps aux
You can enter this command to find the specific dstat process
ps aux | grep dstat
Once you have logged enough data, you can use any spreadsheet to view and graph data.
Building a Scalable and Highly Available PostgreSQL System
For more information about performance tuning for postgreSQL applications, I highly recommend the PostgreSQL 9 High Availability Cookbook. It is worth every penny.Operating System Limits
Linux has default limits imposed out of the box. The following command will show you these limits:
ulimit -Sa
There are times when you might need to adjust these limits (max connections, max open files, etc...). Here is an example reference for LXD/LXC production limit changes.
Here is an example to determine how many connections are occupied by a given user:
lsof -u haproxy | wc -l
Here is an example of how to determine memory locks:
ipcs | grep locked
Systemd Service
The purpose of this section is to make it really easy to create a systemd service.
Steps to get started:
- Add/create your executable file in either /opt/ or /usr/bin/
- Create a service file as root in /etc/systemd/system/your-service.service
[Unit]
Description=Metabase
Documentation=https://some.url
After=multi-user.target
Requires=postgresql.service

[Service]
ExecStart=/opt/metabase/metabase-start.sh
User=metabase
Group=metabase
LimitNOFILE=10000
Restart=on-failure
RestartSec=60

[Install]
WantedBy=multi-user.target
Here are some additional detail regarding metabase specifically:
- See metabase install as an example: https://github.com/chuboe/chuboe-bi-metabase
- Service: https://github.com/chuboe/chuboe-bi-metabase/blob/main/install/metabase.service
- Launch Script: https://github.com/chuboe/chuboe-bi-metabase/blob/main/install/metabase-start.sh
Resources:
- Creating users for systemd services
- sudo useradd -M -r -s /bin/false your-new-user-name
- Where:
- -M - no home directory
- -r - create as system account
- -s /bin/false - no interactive shell
- To test:
- id your-new-user-name
- Be sure to update the service's executable to be owned by your-new-user-name
- Run a bash script:
- ExecStart=/bin/bash /user/bin/some-script.sh #note: /bin/bash should not be needed - included for reference just in case
- Reload service after change - may not be needed - usually able to see service after save
- sudo systemctl daemon-reload
- Service controls
- sudo systemctl status your-service.service # see if it exists and see its state
- sudo systemctl enable your-service.service # sets it to start automatically
- sudo systemctl start your-service.service # starts your service
- view log: journalctl
- clear log:
- sudo journalctl --rotate
- sudo journalctl --vacuum-time=1s
- clear log:
- Type - specifies the type of service
- defaults to 'simple' - most commonly used
- 'oneshot' is another common option - example: run migration script when service restarted. Will not run again until restarted.
- After - specifies when to start
- After=postgresql.service
- After=multi-user.target
- Requires - will not start unless dependency is met
- Requires=postgresql.service
- iDempiere Discussion
Giving yourself Sudo Ability
Add your username to the sudoers group. Note that doing
sudo usermod -aG sudo YourUserNameHere
Running a Sudo Command Without your Password Timing Out
If the sudo password is timing out during an installation, you can to the following to fix the issue:
Enter the command "sudo visudo" to modify the sudoers file.
To make your password never expire, look for a line beginning with "Defaults". Add the following text to the end to to prevent your password from expiring
,timestamp_timeout=-1
If there is not line that begins with Defaults, the create a new line at the end of the file:
Defaults timestamp_timeout=-1
Click ctrl+x and then 'y' to save the file. If the system detects an error, it will notify you when you click ctrl+x
Source: http://lifehacker.com/make-sudo-sessions-last-longer-in-linux-1221545774
To prevent you from being prompted for a sudo password, do one of the following pptions:
Option 1: Allow all sudoers to execute sudo without a password
# Allow members of group sudo to execute any command
%sudo   ALL=(ALL) NOPASSWD: ALL
Option 2: add just your username to the sudoers file with NOPASSWD:
YourUserNameHere ALL=(ALL) NOPASSWD: ALL
Click ctrl+x and then 'y' to save the file. If the system detects an error, it will notify you when you click ctrl+x
Source: http://askubuntu.com/questions/39281/how-to-run-an-application-using-sudo-without-a-password
Multi-threaded (parallel) Bash Script
This is neat (and crazy simple)!
cmd1 & cmd2 && fg
Run as many commands as you wish using "cmd &" followed by "&& fg".
Reference:
Mounting Drives
The section is from John (ERP Adacemy member)...
This is the discussion regarding chattr (see below) to prevent mount points from filling up when mounts fail: https://serverfault.com/questions/337602/best-way-to-prevent-the-root-system-filling-up-when-a-mount-fails. Note that desktop mounts have been a bit problematic using chattr. I'm still working out the issues with chattr in the desktop context.
Generally use ssh to communicate between my desktop and servers (and between servers), except for my dedicated NFS connection between my KVM and NAS servers. Once ssh keys are setup, I can either use fstab with sshfs mount format (especially for server connections) or (for mounts on a desktop) I can make a shell script for execution via a desktop icon (which can be called via a login's startup apps process if desired). The shell scripts are simply as follows.
#!/bin/bash
sshfs user@IPaddress:/remote/directory /mount/point
chattr
When you mount a remote drive, you first create a directory. There are times when the mount fails (race conditions, network availability, etc...). The chattr function concept helps you lock down the initially created directory so that when the mount fails, any attempt to read/write to it also fails. It also ensures that you do not accidentally fill a local drive when you think you are writing to a network share.
To add the immutable flag:
chattr +i [file or directory]

To remove the immutable flag:
chattr -i [file or directory]
Set Timezone
sudo dpkg-reconfigure tzdata
Debugging a Bash Script
bashdb is a nice tool to debug linux scripts. You can step though code and set break points. Here are common usage scenarios:
- Start a new session: bashdb ./someScript.sh
- Step into: "step" or "s"
- Step over: "next" or "n"
- Repeat last command: simply click the enter key
Enabling SSH instead of Password Authentication
If you are initiating the access from ServerA to ServerB just do the following on ServerA.
- ssh-keygen
- ssh-copy-id -i ~/.ssh/id_rsa.pub user@ServerB
- ssh ServerB
If you want to have ssh key access from ServerB to ServerA just repeat the steps on ServerB but replace ServerB with ServerA in steps 2 & 3. You will be prompted for a password in step 2 and I think ssh-keygen prompts for a password while creating the rsa key.
Script to Create a New Linux User with SSH Key
The purpose of this page is to help you create a new Linux user. This is sometimes wanted because the default user is too commonly known (example: ubuntu user in AWS). Here are comments about the below script:- New user will have sudo ability
- New user sudo will not timeout
- New user will have the same bash configuration as your current user
- Notice there are three sections - each section can be copied and pasted as one group of commands at a time
- Be sure to update all variables before you begin - search on the word "VARIABLE" to make sure you see them all
- The below commands assume your local machine is a unix variant (Mac, Linux, etc...)
### SECTION 1 ####

#VARIABLES: set variables for your current system (local)
CHUBOE_CURRENT_SERVER_IP=52.55.90.70
CHUBOE_CURRENT_SERVER_USER=ubuntu
CHUBOE_CURRENT_PEM=chucksteak.pem
CHUBOE_USER=NewUserName #NOTE - change below as well!!

#connect to remote server - this where where you will create the new user and key details
ssh -i ~/.ssh/$CHUBOE_CURRENT_PEM $CHUBOE_CURRENT_SERVER_USER@$CHUBOE_CURRENT_SERVER_IP
#### SECTION 2 ####

#VARIABLES: for the remote server
CHUBOE_USER=NewUserName

#create keys in /tmp directory
#skip this step if keys have already been created. Just copy the existing $CHUBOE_USER.pub to the /tmp/ directory
cd /tmp/
sudo ssh-keygen -f $CHUBOE_USER -N ''
sudo mv $CHUBOE_USER $CHUBOE_USER.pem

#make your current user the owner of these files so you can download .pem later via scp
sudo chown $USER:$USER /tmp/$CHUBOE_USER*

#create $CHUBOE_USER user and give it sudo ability without password
sudo useradd -m $CHUBOE_USER
sudo usermod -aG sudo $CHUBOE_USER
sudo echo "$CHUBOE_USER ALL=(ALL) NOPASSWD:ALL" | sudo tee -a /etc/sudoers

#copy over current .bashrc to the newly created user
sudo rm /home/$CHUBOE_USER/.bashrc
cat ~/.bashrc | sudo -u $CHUBOE_USER tee /home/$CHUBOE_USER/.bashrc
sudo chsh $CHUBOE_USER -s /bin/bash

#create .ssh folder and move files
sudo -u $CHUBOE_USER mkdir /home/$CHUBOE_USER/.ssh
sudo chmod 700 /home/$CHUBOE_USER/.ssh
sudo -u $CHUBOE_USER cat /tmp/$CHUBOE_USER.pub | sudo tee --append /home/$CHUBOE_USER/.ssh/authorized_keys
sudo chmod 600 /home/$CHUBOE_USER/.ssh/authorized_keys
sudo chown $CHUBOE_USER:$CHUBOE_USER /home/$CHUBOE_USER/.ssh/authorized_keys

# remember to remove key data from /tmp after you download it in the below script.
# sudo rm /tmp/$CHUBOE_USER*

#exit back to your local linux machine
exit
#### SECTION 3 ####

#copy remote $CHUBOE_USER.pem to your local machine
#the below statement assume your remote server's user is named 'ubuntu'
scp -i ~/.ssh/$CHUBOE_CURRENT_PEM ubuntu@$CHUBOE_CURRENT_SERVER_IP:/tmp/$CHUBOE_USER.pem ~/.ssh/.
chmod 400 ~/.ssh/$CHUBOE_USER.pem

#download the $CHUBOE_USER.pub just in case you want to use it in another server
scp -i ~/.ssh/$CHUBOE_CURRENT_PEM ubuntu@$CHUBOE_CURRENT_SERVER_IP:/tmp/$CHUBOE_USER.pub ~/Downloads/.

#connect to your remote server with your newly generated key
ssh -i ~/.ssh/$CHUBOE_USER.pem $CHUBOE_USER@$CHUBOE_CURRENT_SERVER_IP

echo "You are now connected as your new user on your remote machine"
Jumpbox (bastion)
Simple one-line solution:
ssh -J ubuntu@131.153.231.161 ubuntu@10.0.0.13
Where 131.153.231.161 is the public IP of the first box, and 10.0.0.13 is the internal IP of the second box (that has no public IP).
Alternatively...
Here is how to configure a local machine (~/.ssh/config) to use a jumpbox (jumpserver):
Host vps1
HostName vps1.example.org
IdentityFile ~/.ssh/vps1.pem
User ec2-user

Host contabo
HostName contabo.example.org
IdentityFile ~/.ssh/contabovps
Port 22
User admin
Proxy Command ssh -q -W %h:%p vps1
Where:
- vps1 is the bastion/jumpbox
- contabo is the desired server to reach
To use the above configuration, restart ssh (sudo systemctl restart ssh) and issue this command:
ssh contabo
References:
Swap Space Best Practices and Tools
Here is a good resource for understanding swap:
Since some pratform providers (like aws, gcp, etc..) do not create swap for you, there are times when you need to create your own. Here is a script what will do this for you. Note that the scrip ignorantly creates a swap space equal in size to the amount of memory. This is overkill for most servers since they do not hibernate (see above faq for details).
- https://github.com/chuboe/idempiere-installation-script/blob/master/utils/chuboe_swap_create.sh (includes swappiness and vfs_cache_pressure settings)
zRAM
zRAM is a utility to effectively increase the memory of your server by utilizing compression. In my experience, this utility might prove beneficial for iDempiere application servers where memory usage is high and CPU usage is low. It uses surplus CPU cycles to increase usable memory.
I do not believe this tool is beneficial for database applications where CPU and memory usage are more balanced.
Here are the quick commands to enable:
sudo apt install zram-tools
echo -e "ALGO=zstd\nPERCENT=60" | sudo tee -a /etc/default/zramswap
sudo service zramswap reload
Here are the more details instructions:
Here is how to test with a really small server (t2.micro with 1GB of ram - which normally cannot support iDempiere):
- fire up a t2 micro (1GB ram) server
- sudo apt update
- sudo apt-get install zram-tools
- sudo nano /etc/default/zramswap # set the following values
- ALGO=zstd
- PERCENT=80
- Note the above puts most of the systems memory into compression.
- ALGO=zstd is the strongest and slowest compression. This will compress most idempiere memory by 75% (400MB will compress to 100MB).
- ALGO=lz4 is the lightest and fastest if interested.
- restart server and install idempiere
- swapon command will show compression block
- zramctl will show “DATA” and “COMPR” columns which indicate the compression ratio of the compressed pages.
- You will need to perform side-by-side testing determine additional load on CPU and performance degradation. I recommend you use a two t2.medium servers (one with zram at the above settings) to measure.
- For the zram server, set /opt/idempiere-server/utils/myExperiment.sh => xmx and xms = 80% (up to 100%} of the amount of memory in the server. For the non-zram server, set xmx and xms to 50% of the amount of memory.
- The way I understand how zram works is that x% of memory will be in the compressed ramdisk at any time.
Here is a good written tutorial:
https://www.craftware.info/projects-lists/faster-linux-on-low-memory-using-zram-ubuntu-22-04/
Here is a generic video tutorial:
https://www.youtube.com/watch?v=7YyGSgZTH8Q
Ubuntu Services Cheatsheet
Install Newer PostgreSQL on Ubuntu
The purpose of this section is to allow users to install a different version of PostgreSQL that what is currently released on your version of ubuntu.
curl -fSsL https://www.postgresql.org/media/keys/ACCC4CF8.asc | gpg --dearmor | sudo tee /usr/share/keyrings/postgresql.gpg > /dev/null

echo deb [arch=amd64,arm64,ppc64el signed-by=/usr/share/keyrings/postgresql.gpg] http://apt.postgresql.org/pub/repos/apt/ jammy-pgdg main | sudo tee -a /etc/apt/sources.list.d/postgresql.list

sudo apt update

sudo apt install postgresql-client-15 postgresql-15 -y
How to Find The Fastest Mirror
https://linuxconfig.org/how-to-select-the-fastest-apt-mirror-on-ubuntu-linux
Get your IP from CLI
curl checkip.amazonaws.com
Auto-Complete
I do not completely understand bash auto complete yet. This section is a list of resources I do not want to forget:
Terminal Bash Strange Behavior
There are times when (few but does happen) the terminal will act strangely. If you execute the following command and you get back 'alacritty', you need to make a change.
echo $TERM
Add the following to your .bashrc
TERM=xterm-256color
Reference: https://github.com/alacritty/alacritty/issues/3360
Lookup IP Location (good for audit logs)
One time via website: https://www.iplocation.net/
lookup-ip.sh bash script and details (courtesy of Ben Cross):
!/bin/bash
 while read item
 do
 curl -s ipinfo.io/$item | tr -d '\n'
 printf "\n"
 done
Usage: (single ip):
echo "58.187.76.66" | ./lookup-ip.sh
Usage: (file of multiple ips)
cat list-of-ips.txt | ./lookup-ip.sh
then use jq command to parse the json
ipinfo.io is the website/endpoint.
Web-based Terminal
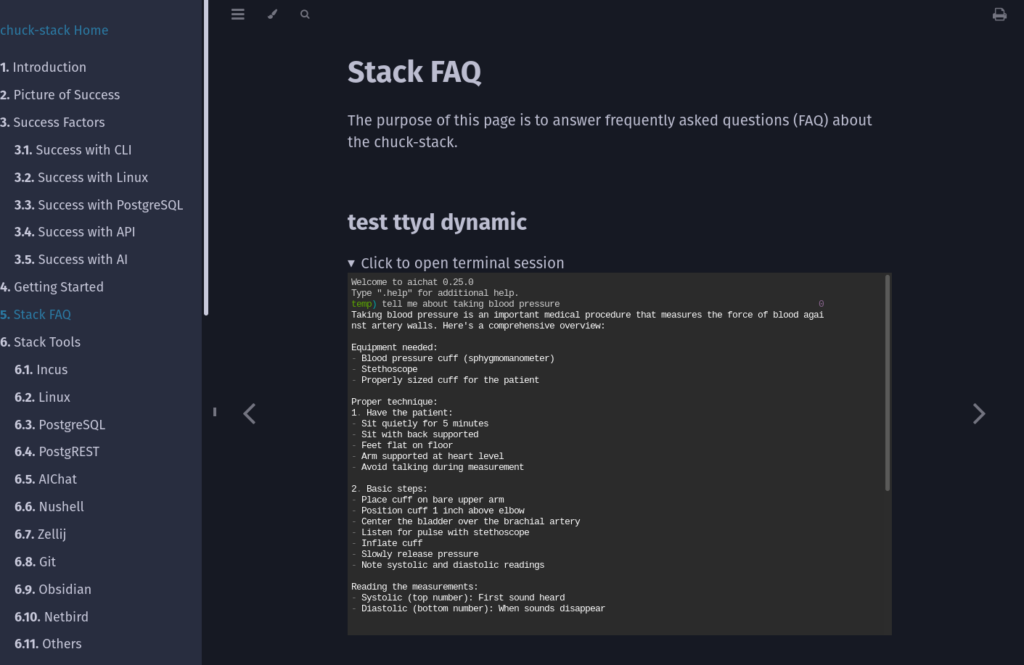
ttyd - good solution to be able to serve an in interactive terminal via a web. Here are some examples:
ttyd -a -W aichat --session
Where:
- -a allows you to add arguments
- -W allows you to write (interact) with the session
- aichat is the command to run
- -- session is the first aichat argument
ttyd -a -W bash
Where you get a terminal prompt.
To embed this is a webpage:
<script>
 function handleToggle(details) {
     const container = details.querySelector('.ttyd-container');
     if (details.open) {
         container.innerHTML = '<iframe src="http://localhost:7681/" style="width: 100%; height: 500px; border: none;"></iframe>';
     } else {
         container.innerHTML = '';
     }
 }
 </script>
 <details ontoggle="handleToggle(this)">
     <summary>Terminal Session 1</summary>
     <div class="ttyd-container"></div>
 </details>
Here is what I like about this solution:
- It can be embedded anywhere (including iDempiere - quickinfo for example)
- It can be viewed incline with current documentation (as seen below)
- It saves chats (unlike the aichat playground) for our future evaluation
- It gives us a platform to deploy more tools directly inside existing apps (more than just 'chat with your docs')
- The terminal is only loaded when someone expands the section, and it is closed as soon as someone closes or reloads.
- Use nginx to create as many entry points (different roles/rags/...) as is needed (one endpoint/port mapping per role - examples: https://localhost/role1/, ... https://localhost/role2)
Debian Ping Error
Recent changes in ping create a scenario where non-root ping attempts result in error. The following resolves the issue:
echo 'net.ipv4.ping_group_range = 0 2147483647' | sudo tee /etc/sysctl.d/50-ping.conf
Alpine Linux on your iPhone, iPad, IOS using ish-app
ish gives you the ability to install and use most linux terminal applications (ssh,nano,vim,...) from an alpine linux terminal. If you have a vpn (wireguard, netbird, ...) installed, you can use the existing VPN to connect via ssh to your remote machines.
Here is the website: https://ish.app/
The app is available via the App Store.