The purpose of this tutorial is to help you understand the printing process and help you create new print formats.
Note: there is an example/demo of creating and deploying a Jasper Report to iDempiere in the below video named "Jasper Reports Deployment Options"
The videos reference here follow immediately. See sections:
Introduction to the Printing Architecture
More Detail about iDempiere and ADempiere Native Print Formats
Print Format (native) Quick Look - Form
The videos reference here follow immediately.
NOTE: if you are updating a GardenWorld print format for export to a different client, I highly recommend you create a copy of the original print format and make your edits to the copy (and not the original). Doing so will make packing out and packing in much easier. Here are the steps to make a copy:
Find the Print Format record you want to modify.
Click the Copy toolbar button to make a copy of the Print Format header record. Be sure to give the new Print Format a unique Name and Description. The Description is important because (unfortunately) the next step will modify the Print Format name. You can use the Description field to find your new Print Format (just in case).
From the new header (copy), click the Gear toolbar button to copy the contents of the old Print Format to the new one.
You now have a complete copy of the Print Format that you can modify and propagate to other clients without risk of updating/depending on the current GW version.
Introduction to the Printing Architecture
This is more focused on Print Format (native), but it is applicable to how Jasper Reports are launched as well.
More Detail about iDempiere and ADempiere Native Print Formats
This is more focused on Print Format (native), but it is applicable to how Jasper Reports are launched as well.
note for 7.1: ./plugins/net.sf.jasperreports.engine_6.6.0.jar
Note you can change the compatibility:
=> Window/Preferences/Jaspersoft Studio/Compability to 6.x.x
Note there are two compatibility settings:
You can set the compatibility for what get created in the jrxml
You can set the compatibility for what is used to compile. See 'Compiler Settings' drop down. Download older versions here.
Download full studio version for release 6.6.0. This is the easier (and probably better) option.
Also note that you can upload jrxml directly to iDempiere (without referencing the compiled). Doing so allows you to avoid the compiler discussion because iDempiere's embedded jasper library will compile the report for you. I have not tested this approach when you have subreports (can you upload to .jrxml files instead of two .jasper files)
Configure iDempiere Data Source in Eclipse
The Jasper Studio plugin includes a PostgreSQL driver. You configure your data source as follows:
assumes the database is located on the same machine (localhost)
assumes your DB port is 5432
assumes your database name is idempiere
Username: adempiere
Pulling Images Dynamically in Jasper from iDempiere
It is frequently asked about pulling images from iDempiere attachments for use in Jasper as a means to dynamically load images. I believe this is possible; however it is difficult. I believe a better solution is create an iDempiere URL field on a record (instead of using an iDempiere attachment). The URL field will point to an image. You can use this URL field as a parameter to the jasper report or as a column in jasper's result set. Either way, it will be available for use as a jasper variable in the report's image path.
Here is a discussion that offers more details.
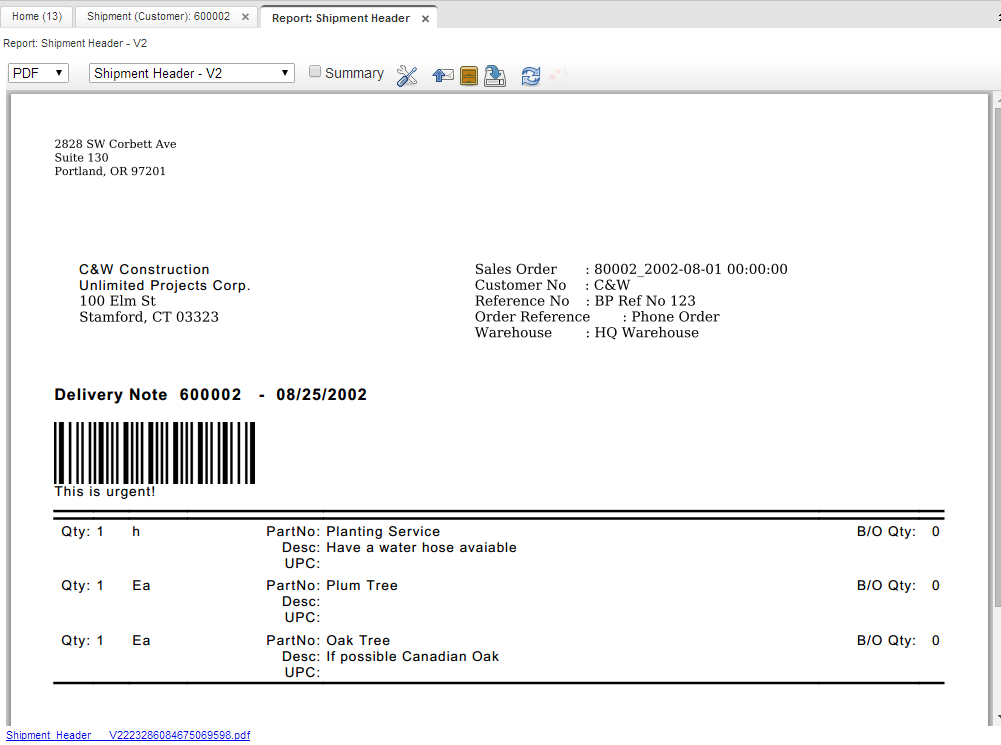
There are times when you need to display much line information in Orders, Shipments, Receipts, Invoices etc... Below is a picture of how you can include a great deal of information in an organized manner. Notice that I removed column headers for the line section. Instead, I am using field prefixes to label each field for easy identification. This type of example line display can scale to 30+ fields for a given line and still remain readable.
You can download the above example. Here are the instructions to install:
Download the above zip file.
Log in as System Administrator Role
Open the Pack In window
Save a new record
Attach the above file
Process the Pack In
Log in to your normal client
Print a shipment
In the upper right corner of your shipment printout, click the drop down and choose the "Shipment Header -V2" option
Note: this print format exists as System. You can copy to your client by clicking the wrench and screwdriver icon and making a copy of the print format header and line records. Do not forget to click the Gear to copy the print format lines as well.
Note the way I accomplished the labels was by adding Column SQL. I could have also added the new fields to the M_InOut_Header_v and M_InOut_Header_vt views to support translation.
Please be quick to let me know if you have any trouble understanding the above concepts or installation instructions.
 You can download the above example. Here are the instructions to install: