The purpose of this lesson is to help you get information into ADempiere and iDempiere.
2015-10-22 - AM Open Discussion Record Import Overview
This quick video discusses the differences between the older style of import (Import Business Partner via I_BPartner and Import File Loader) and the newer style of import (CSV import via toolbar icon).
Import Records General Process - Demonstrated with Product Import
http://wiki.idempiere.org/en/NF1.0_ImportCSV
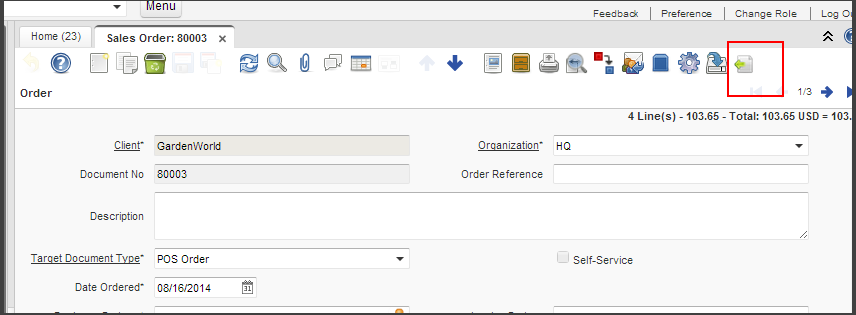
iDempiere has a new Import File Loader feature located on every window. It is located in the top-right icon in the standard window's toolbar.
Here are examples you can use to help you understand the file format:
Note that the automatic linking of the subtab record (line) to the parent tab (order) is created using the Table and Column => Column => IsParent checkbox. The WTF => Tab => Link Column is not observed during the csv upload (as of the time of this writing.)
Execute from Product window with no search filters
Note: Use of /K on both the Product => Search Key (Value) column as well as the Replenish tab primary keys
To find the Replenish subtab primary keys, click on the Replenish subtab and click on 1/x in the upper right corners. The popup dialog shows the primary key columns.
GL Journal - lines only - save this file as a CSV. Note: you must create the header first and update the lines to point to the correct header document no.
GL Journal - header and lines - save this file as a CSV. Note: the date format must be yyyy-MM-dd. You might need to add a tick ( ' ) to the beginning of the string to force xls to treat it as a string (not a date). Xls loves to change date formats.
Business Partner Import - should be implemented in two stages.
Business Partner + Location through the Business Partner window
Contacts through the User window.
See below for how to create your own example CSV for a new window.
Note that the import/export process can go three tables deep in the case of the Business Partner (C_BParnter) + Location (C_BPartner_Location) + Address/Location (C_Location).
Uploading just locations (or any record that only exists as a sub-tab) is a little more challenging; however, it can be done using the following steps. If you have BP's with lots of locations each. Uploading the location separately is easier.
Create a dedicated Location window by copying the tab from the Location tab of the Business Partner window to your own new window.
When you try to import records into your new window, it will complain that some fields are read only. In your new window, update these fields to override the Updatable = Yes so that you can insert these fields.
Import CSV Notes
Column order in your csv matters. The system simulates users entering data field by field from left to right. This means that callouts, conditional read-only logic, etc... can impact your imports.
/K is the Key Column identifier. If you are updating or merging records, you must indicate which records are the key records so that the system knows how to find the exact record to update. You can add the /K suffix to as many columns as you wish. Reference Link
/KT marks the update to occur in a single transaction so that if any record fails, they all fail. Reference link
Import CSV Process
There is a Import CSV Process menu option that provides a couple of benefits over the icon demonstrated above:
The import process gives you visual meter to know where you are in the upload process.
The importing happens outside of the UI thread; therefore, importing uses less system resources and runs more quickly.
This process allows you to import records directly into a subtab without:
Needing the parent tab's primary key using the /K feature. Instead you simply reference the parent foreign key just like any other foreign key.
Needing to use the subtab nomenclature for column names. For example, you do not need to use subtab_table>subtab_field nomenclature. Instead, you can simply reference the subtab_field directly.
To use this feature, you must define an Import Template. The Import Template record helps you (a) limit what columns a user can touch, (b) define alternate/alias column names, and (c) dictate what actions a given role can execute (insert vs update vs merge, etc..) . Defining alternate column names adds convenience when importing files from others since you no longer need to rename the column headers to iDempiere standards.
Steps to create your own example CSV for a new window:
Open the window you wish to import records for.
If you wish to include a specific sub-tab in the export results, click on that sub-tab to make sure it has focus.
Click on the Export Toolbar button and choose CSV. In version 3.0, you can choose multiple sub-tabs to include in your export.
Open the exported file and observe the results.
Please note the export may not include all columns. If you need to import a column that was not exported, simply right-click on the field itself and choose Change Log. In the top-left corner of the Change Log dialog, you will find the name of the column.
This is a really exciting feature for the following reasons:
You no longer need to create a staging table (like I_TableName) and code to import records.
You no longer need to use XLS to create complicated import statements.
You no long need to reference foreign keys by their ID's. Instead, you can use the X_Field_ID[Name] notation to tell the system that you want to find the X_Field_ID of the record in the X_Field table whose column called Name has the value in the CSV.
2014-09-26 - iDempiere New Import and Export
Introduction
0:01:30 Export product data to create an example for using the import process
0:02:00 Review exported CSV data - introduce header nomenclature
No longer need to reference the ID - instead call by name or value
Includes sub-tab table and fields
Example: M_Substitute>M_Product_ID[Value]
0:04:15 Review import CSV pulled from export example
0:05:00 Import (Insert) 6 product records
0:05:30 Review log of imports
0:06:16 Turn some of the previously imported products into BOM lines
0:07:00 Export Product with BOM lines for reference
0:08:00 How to specify import key columns
0:09:30 Merge in BOM lines for existing products
0:10:45 Use the same process to update the Product Name and the BOM Qty at the same time with an additional merge
0:12:15 Difference between Insert, Update, and Merge import methods.
0:13:30 Apply the same concepts to Business Partners, Locations and Contacts
Import New Records into Existing Record's SubTab
Inserting records into an existing record's subtab can be tricky. Instead of using the 'insert' option, you must use the 'merge' option. When using the 'merge' option, you must specify which columns are the key columns (update existing record vs creating a new record).
Here is an example where you merge a Product window => Purchasing subtab record. You must make the Product Tab => Value (search key) a '/K' key column to make sure you find the right product. You must also include the columns in the M_Product_PO table are keys as well.
Here is an example header used to insert lines into an existing invoice:
DocumentNo/K,C_InvoiceLine>C_Invoice_ID[DocumentNo]/K,C_InvoiceLine>C_InvoiceLine_UU/K,C_InvoiceLine>Chuboe_Package_ID[Value]/K,C_InvoiceLine>C_BPartner_Location_ID,C_InvoiceLine>QtyEntered

Here is the sql used to generate this import from a temporary table:

\copy (
    select
    i.documentno "DocumentNo/K",
    i.documentno "C_InvoiceLine>C_Invoice_ID[DocumentNo]/K",
    generate_uuid() "C_InvoiceLine>C_InvoiceLine_UU/K",
    mis.package as "C_InvoiceLine>Chuboe_Package_ID[Value]/K",
    (select min(x.c_bpartner_location_id) from c_invoiceline x where x.c_invoice_id = i.
    c_invoice_id) as "C_InvoiceLine>C_BPartner_Location_ID",
    mis.qty as "C_InvoiceLine>QtyEntered"
from delme_subscription_import_promo_20210702_2 mis
join c_invoice i on mis.c_bpartner_id = i.c_bpartner_id
where i.docstatus in ('DR','IP')
order by i.documentno
)
to
'~/sql/csv/sub_change_20210702.out'
CSV HEADER
;
Convert json to csv and visa versa
I just used a command line (cli) tool named 'recast' to convert a sizeable csv to json.
Here are the details:
Install rust tool chain: https://rustup.rs/
cargo add recast
example command: recast -f csv delme/somedata.csv
the default output is to stdout via json
you can specify the output formal and file location if you wish
Update and Merge Records with iDempiere's New CSV Import Tool
In addition to inserting new records, you can also Update existing records and Merge new records in a window. To accomplish these tasks, you must specify one or more columns as key columns. You do this by adding a "/K" to the end of the column name.
Here is a practical example:
You have 25 products that have an incorrect SKU value.
You open the Product window and use the Lookup toolbar icon to limit the results to just the 25 issues.
You export the Product records to csv.
You modify the CSV to only include two columns: Search Key and SKU.
You modify/correct the SKU values in your csv file.
You add a "/K" to the end of the Search Key (Value) column.
You add a "/KT" if you wish the update to perform in a single transaction where all updates are rolled back if a single error occurs.
You follow the same steps as above to import the CSV only this time you choose "Update" instead of "Insert".
2014-10-30 - Import Sub-Tab Records into a Record that Already Exists
Import Records Manually via SQL - Demonstrated with BOM Import
The purpose of this section is to demonstrate how you can use the command line to automatically migrate data from one database (mysql) to another (psql) using command line tools.
Let's assume that leads are held in a chuboe_lead table in iDempiere. Let's also assume we will create a special import table (i_chuboe_lead) to handle the import from MySQL (your website).
create table i_chuboe_lead (lead numeric, date timestamp without time zone, name character varying(255), phone character varying(255), email character varying(255), address character varying(255), address2 character varying(255), citystatezip character varying(255), country character varying(255), department character varying(255), note character varying(2000));
The below script performs the following:
Copies over data using the MySQL command line tool
Pipes the results of the MySQL command into Postgresql psql command
Ignores duplicates and copies the new entries into chuboe_lead
psql -h your.psql.host -U adempiere -d idempiere -c 'delete from i_chuboe_lead'


mysql -u web.site.db.username -h your.website wordpress -e \
"select
concat(
'insert into i_chuboe_lead values (',
lead,
',',
'''',
date,
'''',
',',
'''',
coalesce(name,''),
'''',
',',
'''',
coalesce(phone,''),
'''',
',',
'''',
coalesce(email,''),
'''',
',',
'''',
coalesce(address,''),
'''',
',',
'''',
coalesce(address2,''),
'''',
',',
'''',
coalesce(citystatezip,''),
'''',
',',
'''',
coalesce(country,''),
'''',
',',
'''',
coalesce(department,''),
'''',
',',
'''',
coalesce(replace(note,'''',''),''),
'''',
');'
) as insert_statement
from website_view_with_lead_data
where date > date_sub(now(),interval 2 day)  --pull last two days
and (phone is not null or email is not null or address is not null)
and department = 'Sales'
order by lead desc
" | psql -h your.psql.host -U adempiere -d idempiere


psql -h your.psql.host -U adempiere -d idempiere -c \
"insert into chuboe_Lead (ad_client_id, ad_org_id, name, email, phone, C_SalesStage_ID, chuboe_LeadSource_ID,description, address1, address2, CityStateZip, created, createdby, updated, updatedby, chuboe_Lead_id, chuboe_lead_ws) select 1000000, 0, name, email, phone, 1000027, 1000002, note, address, address2, citystatezip, now(), 100, now(), 100, nextidfunc(1000935, 'N'), lead from i_chuboe_lead where lead not in (select coalesce(chuboe_lead_ws,99999999) from chuboe_lead)"


psql -h your.psql.host -U adempiere -d idempiere -c 'delete from i_chuboe_lead'
There are times when you need upload records directly into the database via SQL; however, you need iDempiere to generate the next record primary key value (sequence ID). The way to do this is via the iDempiere nextidfunc(AD_Sequence_ID, isSystem) database function. You can find the AD_Sequence_ID in the Document Sequence window by searching on the table's primary key column (example: C_Order_ID). Here is an example of an insert statement using nextidfunc():
 Here are examples you can use to help you understand the file format: